Friday, September 10, 2010
Just On A Break:)
I am taking a break from blogging for a little while. I'll have new posts real soon:)
Saturday, July 24, 2010
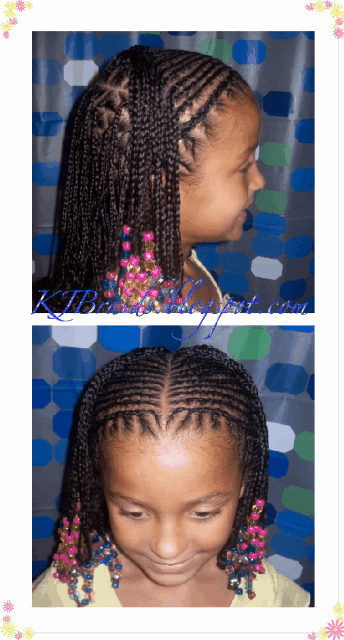
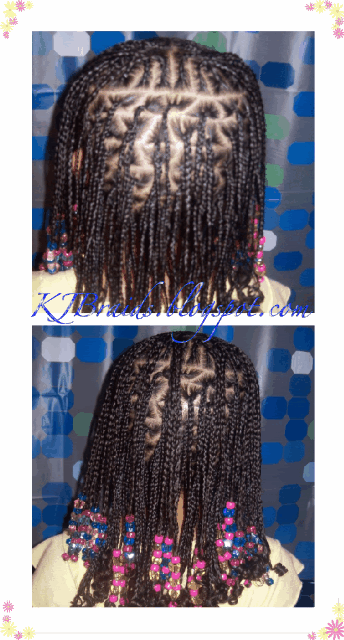
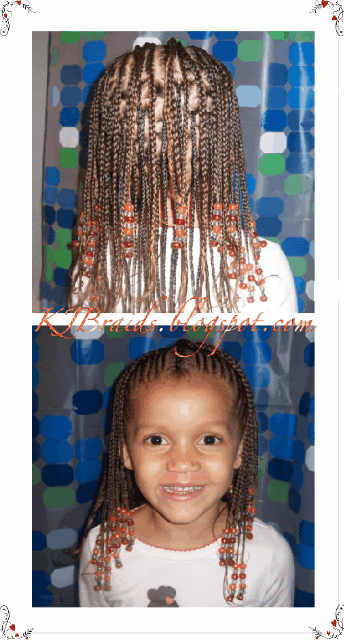
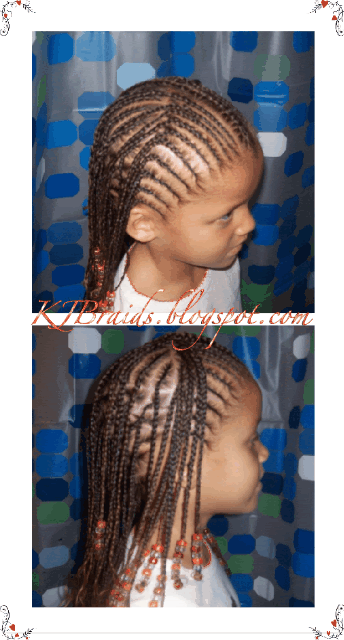
Front Cornrow Individual Braids
Here is a style that I did for my niece D last week, and later I did a similar design for my daughter N. The front half of the head has two layers of cornrow designs and the back is individual braids that are parted into triangles then braided. On the front layers of cornrows I added a pattern of beads on the ends.
Saturday, July 17, 2010
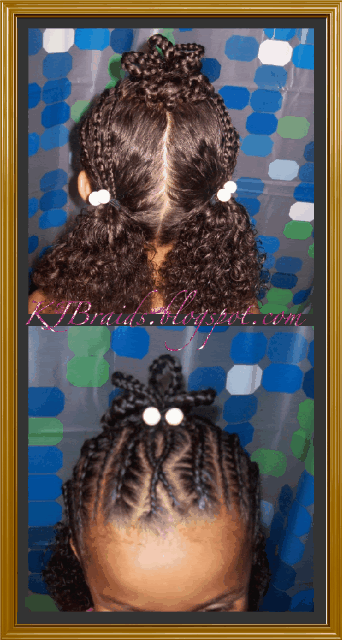
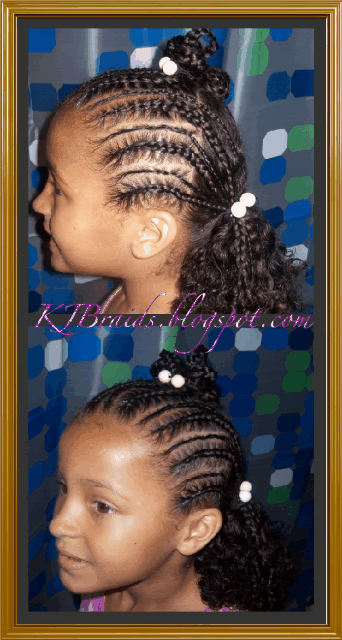
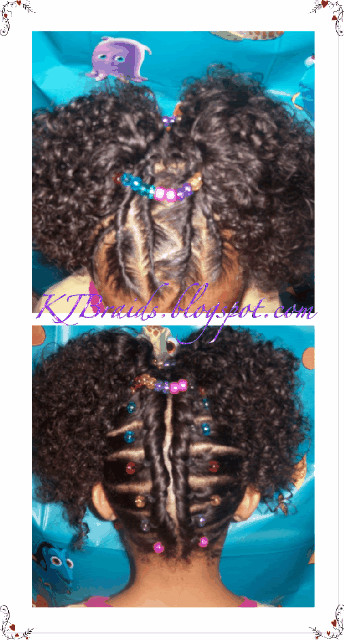
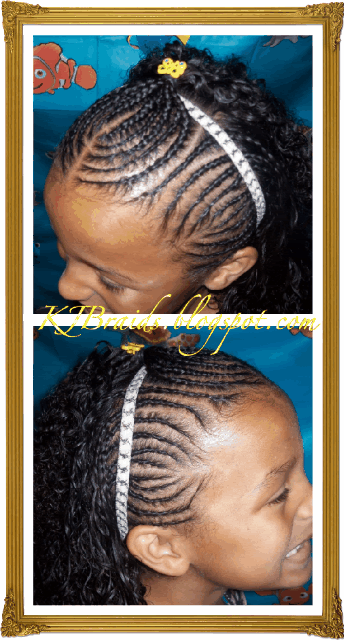
Cornrow Loops into Back Ponytails
This style has half head cornrows which alternate by size, (one thick braid, one much thinner). For the center parts I did two crisscross cornrows. About four of the cornrow ends were tied together up top into the loop forms and I added the bead hair tie for color. I parted the hair down the middle in back and made two ponytails. The ends of the cornrows (from the front) were added into the back ponytails and tied with a rubber band and hair accessories. This style took about an hour or a little less to create.
Saturday, June 26, 2010
Saturday, June 19, 2010
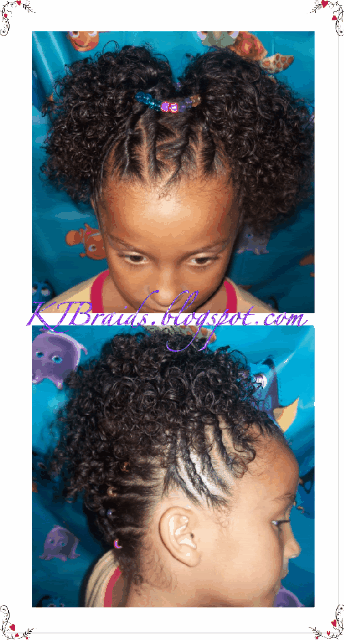
Half Designer Cornrows One Two Pony
These cornrows are from last weeks hair design. I just pulled N.'s hair back into one big pony to create this look (half head designer cornrows with one back pony puff). Then I switched it up and parted her hair down the middle to create two pony puffs. Next weekend will be time to wash N.'s hair, so throughout this week I plan on alternating between these two styles.
N. had an amazing graduation ceremony with her kindergarten class this past week, it was really special. Now, she's on to 1st grade, (I can't believe it), time is going too fast for me:) Have a great weekend everybody! And oh, I can't forget to congratulate my Lakers as well:)
N. had an amazing graduation ceremony with her kindergarten class this past week, it was really special. Now, she's on to 1st grade, (I can't believe it), time is going too fast for me:) Have a great weekend everybody! And oh, I can't forget to congratulate my Lakers as well:)
Sunday, June 13, 2010
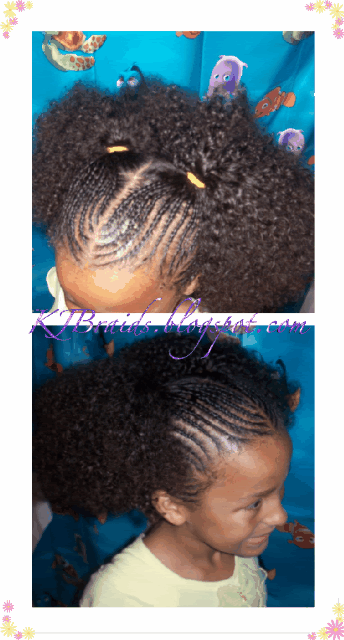
Half Designer Cornrows
This style is a half head designer cornrow pattern. After washing and deep conditioning N.'s hair, I applied Cantu shea butter throughout her hair and parted the front section, pulling the back section in a loose ponytail while working on the front braids. I chose the pattern that I wanted to braid and began with the parting. *It is much easier to create nice , neat looking cornrows when you pay close attention to your parting and make sure that when you are starting a row, that all the extra hair (hair from other sections) are combed and/or pinned neatly out of the way. I applied black beez wax to each section, and combed through the section of hair right before starting the braid. After finishing the cornrows I added a small butterfly clip to the middle top section and finished; N. wanted a few of the photos taken with her head band, and the other views are without:) N. has her Kindergarten graduation tomorrow night and this was the style that we chose, she'll be wearing a cap on her head,so we can't have to many busy hair accessories:)


Sunday, June 6, 2010
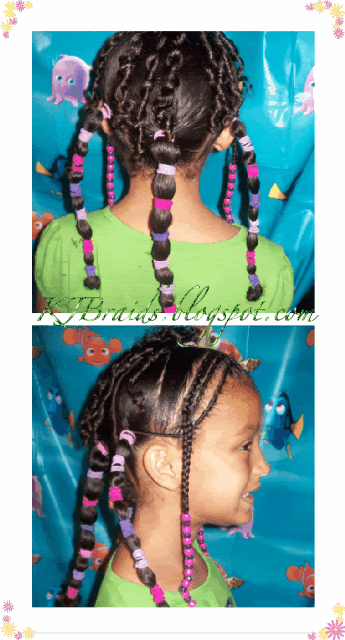
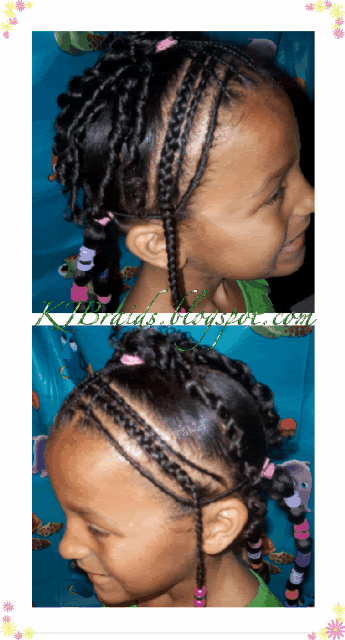
Cornrows Two Strand Twists Banded Ponytails
This style consists of two side to side cornrows, two side to side regular twists, 4 box individual braids, two strand twists and three banded ponytails in back. First off I parted N.'s hair from ear to ear,and tied each section out of the way. Then I began working on the front half. I parted small box (square) shapes for four seperate braids, and braided them all the way through. Then I parted ear to ear, one thin section. I parted it down the middle and made two twists; each going down seperate directions. I then made another thin part from ear to ear and I braided one cornrow starting at the left side and ending down the right, then I switched and braided the other cornrow from the right side and ended down the left side, I added the pattern beads at the end of each cornrow. The front section had a little hair left out so I smoothed it out with the comb and made a pony up top in the middle with the ends of everything. I then did two strand twists on the hair that was in the pony. For the banded ponytails, I made three sections in the back and just combed the hair so that it was smooth and detangled. I added one color hair tie at the top of the ponytail to secure the pony and kept adding different colored hair ties all the way down the ponytail.

Saturday, April 10, 2010
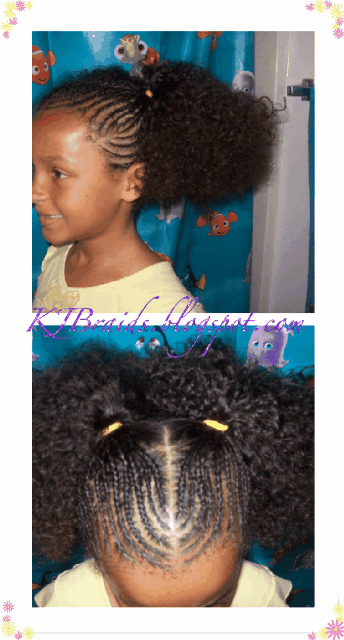
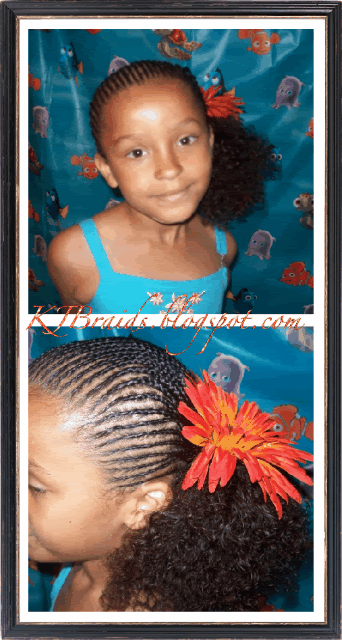
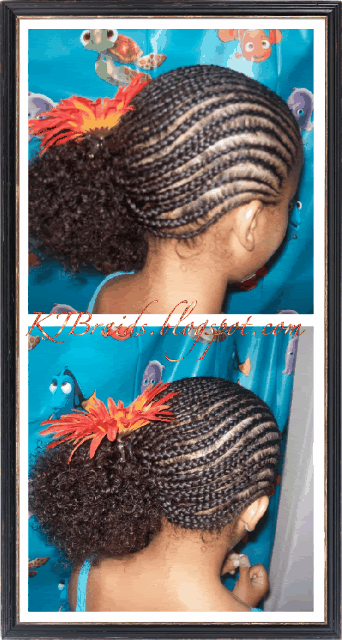
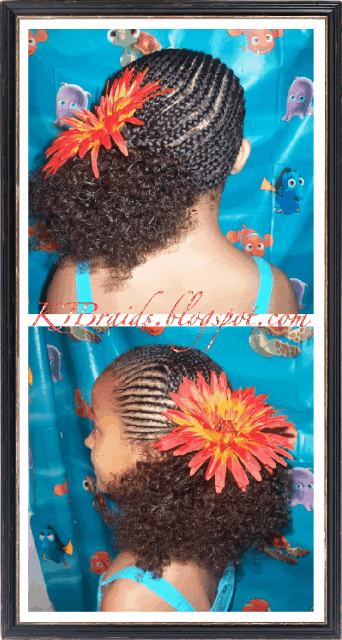
Cornrow Side Floral Pony
Here is a beautiful style that I am very proud of:) This one took a little less than 4 hours to create. It is the cornrow side floral pony style. I braided micro cornrows that all came together to form a pony on the left lower side. I added the floral clip for the final touch. A coworker of mine gave me the floral clip that N. has in the picture. If you are anything like me, you can't afford (nor do you want to) buy hair accessories like these for a crazy amount of money. So, from now on I will be making a trip over to Michaels (craft store) and buying some nice artificial flowers, as well as the clips, and putting them together myself:) This style turned out amazing and it was well worth the 4 hour wait. My daughter N. loves it as well:) Do you have any tips or ideas on inexpensive/creative hair accessories to make at home? Let us know.
Thursday, April 8, 2010
Ponytails Zig Zag Braid
Here was a style that I did for N. in between washes this week. Her last hairstyle (the updo) was only in for a short time, so before I washed her hair again I did this ponytail zig zag braid style. I just parted a zig zag part down the middle of her hair, braided it and added a few big beads. Then I braided two tiny braids in the front (one on each side) about 3/4 of the way down, leaving the ends out to show the curl at the end. Then I put the two sides of remaining hair up into two ponytails and added some hair accessories.
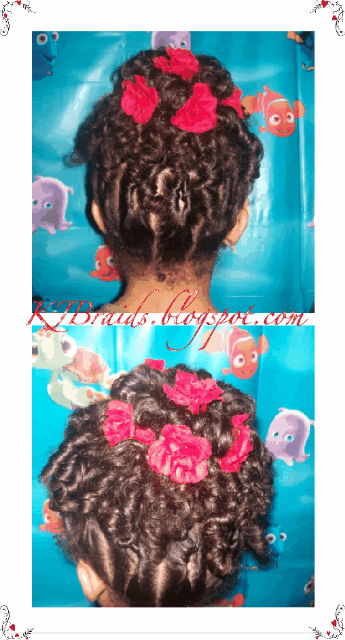
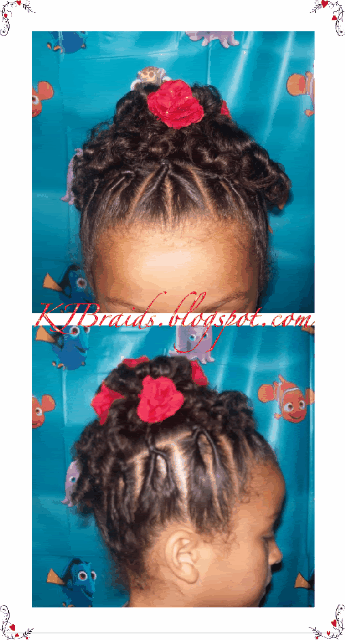
Rose Half Updo
This was the original updo I style. I changed it up just a little bit and settled on this for Easter morning. The original updo I style did not last until the next morning, it was already frizzy and coming out. I decided to take down the back half and leave it out, curls in all:) I did the same pony tail up top, and tied the ends into loops. Then left the ends out, natural curls and added the red roses.
Saturday, March 13, 2010
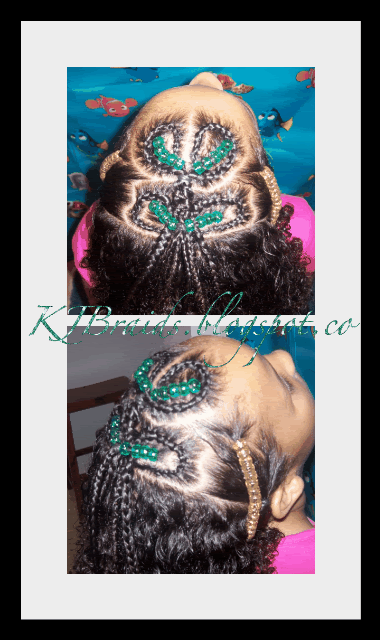
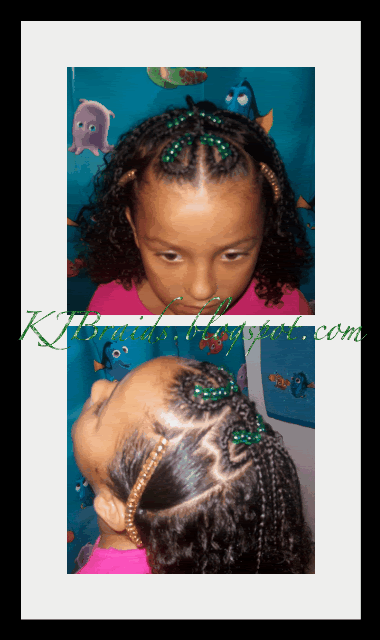
St. Patricks Day Style
Here is a new style for St. Patricks Day. For this design I parted the hair from ear to ear and applied the smooth and shine gel product to the curls in the back. For the four leaf clover in the middle, I parted sections that were shaped like a clover, and braided a cornrow to outline the shape, then for the extra hair in the center of each leaf I put green glitter beads and then braided the ends. All of the ends of the clover are brought to the middle and tied with a rubber band. For the side of the hair,I sectioned a small part and added gold glitter beads all the way down. For the rest of the hair on the sides, I smoothed and combed the hair and tied it in the back,underneath.
Thursday, March 11, 2010
Half Pull Throughs & Cornrows
This style has half of the head done with a combo of cornrows and pull throughs. First I sectioned the hair (ear to ear), tied the hair in the back with a hair tie, and began working on the front. I did one cornrow and tied it with the rubber band and clip. Then I did a pull through, and finished with the same. I created this pattern on all the sections up front, except for the very middle section, that was one big twist. At the end of each cornrow and pull through, I twisted the end of the hair a little bit, to make a circle, (like a small bun), and then clipped with the small clips.


Pony Braids
This is the pony braids style. I got the idea from Ms. Nikki @ Beads Braids and Beyond, (I gotta give credit:) First I started on the front sections, I parted the hair for the shape I wanted the top pony to be, tied it with the rubber band, and braided it. Then parted the hair for the few cornrows that are in front and around the hair line, and added the two extra pony tails on each side. For the back I parted the hair for the round cornrow and put it aside while I pulled back that middle pony tail. Then I finished the round shaped cornrow and braided all the ends of the hair. Last, I added the hair accessories.


Wednesday, March 10, 2010
X Braids Two Strand Twists
This one is the X braid in the back with four small pony tails and all the ends are twisted with two strands. This cornrow design in the front is pretty basic, no difficult pattern or anything. I made the cornrows come together in the middle to make five seperate pony tails, and added the hair accessories. The back design of this style is something found on Beads Braids and Beyond from the talented Nikki. First I made the parts for the x shape and braided one side, then when I did the other side of the x that braid actually crosses over the other. Then I made four pony tails in the back with the extra hair sections. The ends of the hair (the top cornrows and the pony tails in the back) are twisted with two strands.


Butterfly Half Cornrows
This style was for my neice D.'s 3rd birthday party last year:) I planned on this being shaped exactly like a butterfly on top. I would definetly be able to create this look again but much better looking. So here is the idea, braid one cornrow down the center of the head (for the butterfly body) then take the comb and literally outline the shape of a butterfly, one the right side and on the left side, and start your cornrows in the shape, then tie them up top with the rubber bands. The body and the sides of the butterfly cornrows all came together up top, in the middle and added the hair accessories. For the sides of the hair I just made regular cornrows. Near the front of her hair line, I parted a straight section, from one side to the next. With this section I made two cornrows on each side, one coming straight down the side and added butterfly beads, the other cornrow goes from the top and ends below the eye level (leaving the curl at the bottom of the braid). The back of the hair was left out with her beautiful curls.


Tuesday, March 9, 2010
Beaded Combo Braid
This style is the beaded combo braid, that has small braids combined into one big braid. *I absolutely love this style, it is beautiful* First I parted a section in the front, pulled the hair in the back away with a hair tie. The front section was then parted evenly down the middle. (I am now standing on the right side of my daughter looking down on her hair). On the left side of the parted section, I braided small cornrows that are going inward toward the right side, and are braided all the way down the hair strand. Then for the opposite side (the right section) I braided the cornrows going inward toward the left side, and again braiding all the way down each strand of hair. Then at the begining of the two seperated, braided sections, I started to braid them into one big braid going from one side of the head to the next (basically a big french style braid). Then as I got to the end of the big braid, I tied a rubber band (matching the hair color) around it and started beading with all those fabulous colors:) At the back of her hair I combed and detangled (of course) and sectioned layers of her hair, (I like to start at the bottom, back) and rolled her hair in rollers. I know there are a million and one rollers to choose from, and whatever you pick that works best for you, go ahead and use them. I have the Conair head to toe spiral rollers, I have the purple and the pink ones that are different sizes. I like to alternate the rollers when I use them. For instance, roll one section in a big purple spiral roller, the next one I will use the smaller pink spiral roller. It makes the curls look more natural, and full. I knew my daughter N. had alot of hair, but when I took out these spiral rollers from her hair, I said wow! I couldn't beleive how full her hair looked, it was beautiful. If you try any of these styles, I would love to see how they turned out. Send me some pics and I can start a hair share, similar to that of the great Nikki at Beads Braids and Beyond:)


and...

Criss Cross Braid Ponys
Here is the criss cross braids into two ponys style. First I parted the hair exactly down the middle. Then I parted (left to right) a thin section in the front (which is used for the twists). I smoothed out the pony and did not put the hair tie on just yet. For the sides, I made two square/diamond sections one by each ear, and braided them all the way through, adding a rainbow pattern bead desing. For the braids up top, I made the same shape for the sections and as I pulled them back toward the ponytails, I braided them all the way, then divided them equally, so the left side of the braids were pulled back into the right side pony, and so on for the other side. Then each ponytail was secured with a rubber band and the hair accessories.


and...

Monday, March 8, 2010
The Kids Photo I
Here is a few shots I wanted to share. After my neice D.'s Princess Tiana Bun hairstyle was finished, everyone lined up for a photo shoot:) I have my camera out to take a photo of each hair stlyle that I do, and they love to say cheese for me:)


Cornrows One Pony Puff
This style is a designer style cornrow design that ends up top with the pony tail, (puff). I just sectioned and braided each cornrow, tied them with the rubber bands on top, and added a big hair tie to pull all the braids together. I then added the beautiful red bow for some color, and there it is:)


About a week later I wanted to change up the style a little bit, so I just took the top pony tail out and parted three seperate sections. I made three pony tails, and added some color with the pink hair ties. Here is that one.

Sunday, March 7, 2010
Half Cornrows
Here are a couple of "half head" cornrow style designs. The first on my daughter N. is basic, most of the braids are just straight back and tied up top with the rubber band. A couple of the braids in the middle are curved, so just part with the tip of the comb, (as though you were drawing) and make a swirl movement which will create the curved part, continue with the braid and you got it. The back of the hair has some of the Bioterra product, which is a curling creme.


and...
This one on my neice D. has three sections that are parted, each set are cornrowed going three seperate ways. The back few cornrows are small and go straight back, then tie off with the rubber band. The middle part was parted on a slant and sectioned off, three going to the left and about five going toward the right. I braided each at a slant and curved up toward the center and tied with the rubber bands. In this picture D.'s hair has no product on her curls, just the water and conditioner. (That's why it looks so flat and wet) When I was finished with her braids, I applied some of the Bioterra product as well.

Saturday, March 6, 2010
Poinsettia Hairstyle
Here is a style that I did on my daughter N.'s hair for Christmas last year. The design is shaped like a poinsettia leaf. First I parted straight across, ear to ear. Tied the back section in a pony tail and out of the way. The front section, I parted in the shape of the poinsettia leaf and braided a cornrow for the outline of it, then the inside of the poinsettia leaf was combed out straight and tied with a rubber band. N.'s Christmas dress was black with leopard print, so I used the gold and black beads. The beads were added to each tip (top) of the poinsettia leaf, alternating gold and black. The end strands of each poinsettia leaf and each straightend end, I twisted and pinned them at the top with a light color clip.


Three Pony Zig Zag
This style was done just last weekend for my daughter N. For this one, I made a zig zag part down the the center of the head. The left side cornrows all slightly curved to end and tie off at that pony, and so on for the right side. Then for the back I made an even part from the left side to the right. Now you have two sections on the back; the bottom section has parts straight down and the cornrows are simple and braided all the way through, tied off with the bead pattern and a rubber band. The upper half section in the back is parted in swirly style sections and the cornrows are braided upward, and are then tied into a rubber band, which forms the third pony that you see. *In some later posts I am going to show more step by step pics and instructions on parting different ways and also the beading of the braids. If you have any other suggestions for me, leave me a comment:)


and...

What is your hair type?
I have seen and heard alot of talk about classifications of hair type, (wavy/curly hair). I always heard about 3a and 4b, and so on. Yet, I never understood how you fiqure out what type of curl you have. So I have done some searching and figured out a little something , hopefully this helps, (if you are at all interested or just curious:) This first one is determing the curliness of your hair, which is the first classification.
*The Wavy Ones*
2A- loose, stretched out S waves throughout the hair
2B- shorter, more distinct S waves
2C- distinct S waves and the odd spiral curl forming here and there

*The Curly Ones*
3A- big, loose spiral curls
3B- bouncy ringlets
3C- tight corkscrews

*The Really Curly Ones*
4A- tightly coiled S curls
4B- tightly coiled hair bending in sharp angles

Now from what I understand this is just the first classifier in determining what hair type you have. There is a second one which is determining the look of your individual strands.
*F- Fine*
Thin strands that sometimes are almost translucent when held up to the light.
*M- Medium*
Strands are neither fine nor coarse
*C-Coarse*
Thick strands
The third classifier is determining the overall volume of your hair. Put your hair in a ponytail with as much hair as possible in it. Measure the circumference of the ponytail.
*i- thin (less than 2 inches/5centimeters)
*ii- normal (between 2-4 inches or 5-10 centimeters)
*iii- thick (more than 4 inches/10 centimeters)
Seems like alot of work, right? Well, in my opinion if you really want to know the hair type you have (yourself or your little one) for the purpose of finding a good hair product for that specific type, then all you need to do is decide from the first classifier. The easiest and quickest, so good luck, hope this all helped:) If you have a different opinion or any thoughts, suggestions or advice you wanna share, please comment, we'd love to hear it:)
Pullthroughs with Twists
This style is an idea I got from checking out the skills over at The Story of a Princess and Her Hair. I simply parted at the middle of the head from ear to ear, tied the back section out of the way in a pony. I parted the front section and combed out to make a smooth straight look, then I pulled each side together in the back (underneath the back section) and tied with a rubber band. For the pullthroughs, I just parted a few square sections to make them and finally the ends of the hair up top, were twisted really good, and pinned directly up top using the small clips. The back that was tied out of the way, I took out and put a little hair product in.


Thursday, March 4, 2010
The Princess and the Frog Release
N. and I are so excited for the big day, March 16. The Princess and the Frog is coming out on DVD:) Check it out! http://disney.go.com/disneypictures/princessandthefrog/


Beaded Cornrows w/ Half Individuals
My daugher N. loved this one, very colorful with the beads on top:) I parted the front (not down the center) and started the cornrows. At the end of the cornrows (about half way down) I added a bead to each one and tied it off with the rubber band and continued braiding the hair (regular braid off the head), I then stopped before I got to the end and left the hair out to get the natural curl look at the end. For the back side I sectioned the hair into small trianles and braided off the head just a little ways down, leaving the ends out for the natural curls to show. This style lasted about a week. Something was really funny, notice the giggles:)


Boy Styles II
Here's another nice style for a boy. This one is a little complicated, but like I said before it is all about the parting. When I first got interested in braiding, I ordered a doll head to practice on and watched an online class tutorial on all the how to's of hair braiding cornrows. Eventually after much practice and patience I got it down. Hope you like:)


Subscribe to:
Posts (Atom)