Saturday, March 13, 2010

St. Patricks Day Style

Here is a new style for St. Patricks Day. For this design I parted the hair from ear to ear and applied the smooth and shine gel product to the curls in the back. For the four leaf clover in the middle, I parted sections that were shaped like a clover, and braided a cornrow to outline the shape, then for the extra hair in the center of each leaf I put green glitter beads and then braided the ends. All of the ends of the clover are brought to the middle and tied with a rubber band. For the side of the hair,I sectioned a small part and added gold glitter beads all the way down. For the rest of the hair on the sides, I smoothed and combed the hair and tied it in the back,underneath.
Photobucket
Photobucket

Thursday, March 11, 2010

Half Pull Throughs & Cornrows

This style has half of the head done with a combo of cornrows and pull throughs.  First I sectioned the hair (ear to ear), tied the hair in the back with a hair tie, and began working on the front.  I did one cornrow and tied it with the rubber band and clip.  Then I did a pull through, and finished with the same.  I created this pattern on all the sections up front, except for the very middle section, that was one big twist. At the end of each cornrow and pull through, I twisted the end of the hair a little bit, to make a circle, (like a small bun), and then clipped with the small clips.

Pony Braids

This is the pony braids style.  I got the idea from Ms. Nikki @ Beads Braids and Beyond, (I gotta give credit:) First I started on the front sections, I parted the hair for the shape I wanted the top pony to be, tied it with the rubber band, and braided it. Then parted the hair for the few cornrows that are in front and around the hair line, and added the two extra pony tails on each side.  For the back I parted the hair for the round cornrow and put it aside while I pulled back that middle pony tail.  Then I finished the round shaped cornrow and braided all the ends of the hair. Last, I added the hair accessories.

Wednesday, March 10, 2010

X Braids Two Strand Twists

This one is the X braid in the back with four small pony tails and all the ends are twisted with two strands.  This cornrow design in the front is pretty basic, no difficult pattern or anything. I made the cornrows come together in the middle to make five seperate pony tails, and added the hair accessories.  The back design of this style is something  found on Beads Braids and Beyond from the talented Nikki.  First I made the parts for the x shape and braided one side, then when I did the other side of the x that braid actually crosses over the other.  Then I made four pony tails in the back with the extra hair sections. The ends of the hair (the top cornrows and the pony tails in the back) are twisted with two strands.

Butterfly Half Cornrows

This style was for my neice D.'s 3rd birthday party last year:) I planned on this being shaped exactly like a butterfly on top.  I would definetly be able to create this look again but much better looking.  So here is the idea,  braid one cornrow down the center of the head (for the butterfly body) then take the comb and literally outline the shape of a butterfly, one the right side and on the left side, and start your cornrows in the shape, then tie them up top with the rubber bands. The body and the sides of the butterfly cornrows all came together up top, in the middle and added the hair accessories. For the sides of the hair I just made regular cornrows. Near the front of her hair line, I parted a straight section, from one side to the next. With this section I made two cornrows on each side, one coming straight down the side and added butterfly beads, the other cornrow goes from the top and ends below the eye level (leaving the curl at the bottom of the braid). The back of the hair was left out with her beautiful curls.

Tuesday, March 9, 2010

Beaded Combo Braid

This style is the beaded combo braid, that has small braids combined into one big braid.  *I absolutely love this style, it is beautiful* First I parted a section in the front, pulled the hair in the back away with a hair tie.  The front section was then parted evenly down the middle. (I am now standing on the right side of my daughter looking down on her hair). On the left side of the parted section, I braided small cornrows that are going inward toward the right side, and are braided all the way down the hair strand.  Then for the opposite side (the right section) I braided the cornrows going inward toward the left side, and again braiding all the way down each strand of hair. Then at the begining of the two seperated, braided sections, I started to braid them into one big braid going from one side of the head to the next (basically a big french style braid).  Then as I got to the end of the big braid, I tied a rubber band (matching the hair color) around it and started beading with all those fabulous colors:) At the back of her hair I combed and detangled (of course) and sectioned layers of her hair, (I like to start at the bottom, back) and rolled her hair in rollers.  I know there are a million and one rollers to choose from, and whatever you pick that works best for you, go ahead and use them.  I have the Conair head to toe spiral rollers, I have the purple and the pink ones that are different sizes.  I like to alternate the rollers when I use them.  For instance,  roll one section in a big purple spiral roller, the next one I will use the smaller pink spiral roller.  It makes the curls look more natural, and full. I knew my daughter N. had alot of hair, but when I took out these spiral rollers from her hair, I said wow! I couldn't beleive how full her hair looked, it was beautiful.  If you try any of these styles, I would love to see how they turned out.  Send me some pics and I can start a hair share, similar to that of the great Nikki at Beads Braids and Beyond:)
and...

Criss Cross Braid Ponys

Here is the criss cross braids into two ponys style. First I parted the hair exactly down the middle. Then I parted (left to right) a thin section in the front (which is used for the twists). I smoothed out the pony and did not put the hair tie on just yet.  For the sides,  I made two square/diamond sections one by each ear, and braided them all the way through, adding a rainbow pattern bead desing.  For the braids up top, I made the same shape for the sections and as I pulled them back toward the ponytails, I braided them all the way, then divided them equally, so the left side of the braids were pulled back into the right side pony, and so on for the other side. Then each ponytail was secured with a rubber band and the hair accessories.

and...


Monday, March 8, 2010

The Kids Photo I

Here is a few shots I wanted to share.  After my neice D.'s Princess Tiana Bun hairstyle was finished, everyone lined up for a photo shoot:) I have my camera out to take a photo of each hair stlyle that I do, and they love to say cheese for me:)

Cornrows One Pony Puff

This style is a designer style cornrow design that ends up top with the pony tail, (puff). I just sectioned and braided each cornrow, tied them with the rubber bands on top, and added a big hair tie to pull all the braids together.  I then added the beautiful red bow for some color, and there it is:)
About a week later I wanted to change up the style a little bit, so I just took the top pony tail out and parted three seperate sections.  I made three pony tails, and added some color with the pink hair ties. Here is that one.

Sunday, March 7, 2010

Half Cornrows

Here are a couple of "half head" cornrow style designs.  The first on my daughter N. is basic, most of the braids are just straight back and tied up top with the rubber band. A couple of the braids in the middle are curved, so just part with the tip of the comb, (as though you were drawing) and make a swirl movement which will create the curved part, continue with the braid and you got it. The back of the hair has some of the Bioterra product, which is a curling creme.
and...

This one on my neice D. has three sections that are parted, each set are cornrowed going three seperate ways.  The back few cornrows are small and go straight back, then tie off with the rubber band.  The middle part was parted on a slant and sectioned off, three going to the left and about five going toward the right. I braided each at a slant and curved up toward the center and tied with the rubber bands. In this picture D.'s hair has no product on her curls, just the water and conditioner. (That's why it looks so flat and wet) When I was finished with her braids, I applied some of the Bioterra product as well.

Saturday, March 6, 2010

Poinsettia Hairstyle

Here is a style that I did on my daughter N.'s hair for Christmas last year.  The design is shaped like a poinsettia leaf. First I parted straight across, ear to ear.  Tied the back section in a pony tail and out of the way.  The front section, I parted in the shape of the poinsettia leaf and braided a cornrow for the outline of it, then the inside of the poinsettia leaf was combed out straight and tied with a rubber band. N.'s Christmas dress was black with leopard print, so I used the gold and black beads.  The beads were added to each tip (top) of the poinsettia leaf, alternating gold and black.  The end strands of each poinsettia leaf and each straightend end, I twisted and pinned them at the top with a light color clip.

Three Pony Zig Zag

This style was done just last weekend for my daughter N. For this one, I made a zig zag part down the the center of the head. The left side cornrows all slightly curved to end and tie off at that pony, and so on for the right side.  Then for the back I made an even part from the left side to the right. Now you have two sections on the back; the bottom section has parts straight down and the cornrows are simple and braided all the way through, tied off with the bead pattern and a rubber band.  The upper half section in the back is parted in swirly style sections and the cornrows are braided upward, and are then tied into a rubber band, which forms the third pony that you see. *In some later posts I am going to show more step by step pics and instructions on parting different ways and also the beading of the braids.  If you have any other suggestions for me, leave me a comment:)
and...

What is your hair type?

I have seen and heard alot of talk about classifications of hair type, (wavy/curly hair).  I always heard about 3a and 4b, and so on.  Yet, I never understood how you fiqure out what type of curl you have.  So I have done some searching and figured out a little something , hopefully this helps, (if you are at all interested or just curious:) This first one is determing the curliness of your hair, which is the first classification.

*The Wavy Ones*
2A- loose, stretched out S waves throughout the hair
2B- shorter, more distinct S waves
2C- distinct S waves and the odd spiral curl forming here and there


*The Curly Ones*
3A- big, loose spiral curls
3B- bouncy ringlets
3C- tight corkscrews


*The Really Curly Ones*
4A- tightly coiled S curls
4B- tightly coiled hair bending in sharp angles


Now from what I understand this is just the first classifier in determining what hair type you have. There is a second one which is determining the look of your individual strands.

*F- Fine*
Thin strands that sometimes are almost translucent when held up to the light.

*M- Medium*
Strands are neither fine nor coarse

*C-Coarse*
Thick strands

The third classifier is determining the overall volume of your hair. Put your hair in a ponytail with as much hair as possible in it.  Measure the circumference of the ponytail.

*i- thin (less than 2 inches/5centimeters)

*ii- normal (between 2-4 inches or 5-10 centimeters)

*iii- thick (more than 4 inches/10 centimeters)

Seems like alot of work, right? Well, in my opinion if you really want to know the hair type you have (yourself or your little one) for the purpose of finding a good hair product for that specific type, then all you need to do is decide from the first classifier. The easiest and quickest, so good luck, hope this all helped:) If you have a different opinion or any thoughts, suggestions or advice you wanna share, please comment, we'd love to hear it:)

Pullthroughs with Twists

This style is an idea I got from checking out the skills over at The Story of a Princess and Her Hair.  I simply parted at the middle of the head from ear to ear, tied the back section out of the way in a pony. I parted the front section and combed out to make a smooth straight look, then I pulled each side together in the back (underneath the back section) and tied with a rubber band.  For the pullthroughs, I just parted a few square sections to make them and finally the ends of the hair up top, were twisted really good, and pinned directly up top using the small clips.  The back that was tied out of the way, I took out and put a little hair product in. 

Thursday, March 4, 2010

The Princess and the Frog Release

N. and I are so excited for the big day, March 16.  The Princess and the Frog is coming out on DVD:) Check it out!  http://disney.go.com/disneypictures/princessandthefrog/ 

Beaded Cornrows w/ Half Individuals

My daugher N. loved this one, very colorful with the beads on top:) I parted the front (not down the center) and started the cornrows.  At the end of the cornrows (about half way down) I added a bead to each one and tied it off with the rubber band and continued braiding the hair (regular braid off the head), I then stopped before I got to the end and left the hair out to get the natural curl look at the end.  For the back side I sectioned the hair into small trianles and braided off the head just a little ways down, leaving the ends out for the natural curls to show. This style lasted about a week. Something was really funny, notice the giggles:)

Boy Styles II

Here's another nice style for a boy.  This one is a little complicated, but like I said before it is all about the parting.  When I first got interested in braiding, I ordered a doll head to practice on and watched an online class tutorial on all the how to's of hair braiding cornrows.  Eventually after much practice and patience I got it down.  Hope you like:)

Boy Styles I

Here is my nephew J. he comes every two weeks to get his curls braided:)  Here is a stlye that I did not to long ago.  Once you get your technique down and your parts lined up right, you'll be good to do any style of cornrows.  Usually all the boy stlyes that I do, take about 2 hours to complete.  Do you have any boy styles you'd like to share or do you have any ideas, comments, etc. let us know.

Cornrow Half Pony w/ Beads

This style is simple and cute.  I cornrowed half of the hair up into a pony and and twisted the ends of the hair slightly to get the bigger ringlets.  Then for the back side, I did cornrows straight down and added a pattern of beads for some color.             


Heart Shaped Cornrow/Half Down

For this heart shaped design I parted the hair on top in into the shape of a heart as I braided each section. First part down the center and part the same on each side to create the heart shape evenly. Then the ends of the braids came together at the center/middle of the head and tied off with a rubber band.  The sides are basic cornrows ending near the top/side of the head. Added the hair accessories to match the  rainbow colored beads that are coming up in the back sections.  For the back style, the cornrows have two layers, straight down, easy parts and of course added the cute rainbow bead pattern. 

My Products

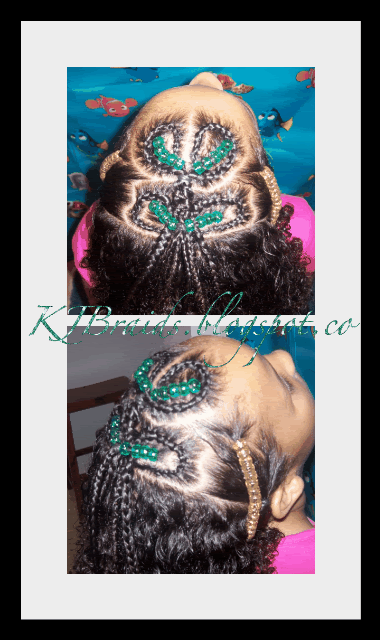
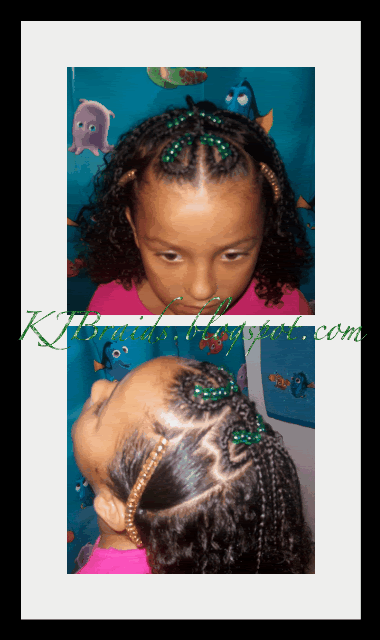
When I do cornrows I use the Proclaim Beeswax, (depending on the hair color of the client) I use either the black or the clear.  This product is great for braids, cornrows and dreads. It helps to keep the hair down and remain all in the braid.  On my daughter N.'s hair, in between washes, every day or every other day I do one of two things.  First is the Cantu Shea Butter, this is for super shine, helps prevent breakage, repairs split ends and most importantly reduces frizz:) Second  I just use the spray bottle which contains water and conditioner.  I am always searching for a new and improved hair product for curls, especially when I need a product for my daughter and my son's hair when going all natural. For now I am using Bioterra from Naturelle, it is a curling creme styling product. So far it is a good product, my only problem with it is that it isn't very good for eliminating or reducing the frizz.  Also, the Smooth N Shine Gellation styling gel.  This product is good, I like the hold of the product.  When I am searching for a good hair product for the kids, I obviously have to keep in mind the price, and the products that I use currently are great on that.  I do love Carol's Daughter 's products, I have the Healthy Hair Butter right now, and it helps with conditioning and shine.  If you can afford their products in your budget, then that's the way to go.  So let us know if you have found a great product that lives up to it's claims and offers a great deal, love to hear about it:)

Designer Cornrow Pony Puff

This one was one of the hard ones for me, designer cornrows into a back pony puff.  The parts on this style go all different directions and each cornrow was tied off in the back, then I just pulled all the hair back into one big pony. I added two cornrows on each side going down the front and added some black and white beads. 

Wednesday, March 3, 2010

Alicia Keys Style

This style is one that resembles an Alicia Keys design.  It's one of my favorites:) It took about 3 hours to create with all the breaks. This one is fairly easy because there isn't alot of parting in various designs, etc.  Just straight parts through the back and on top a few curves.  I didn't want to add all the beads to the side of my daughter's hair (to much weight) So I decided to add the two side braids and add the bead pattern. 


Tuesday, March 2, 2010

Naturally Curly

Last week I gave my daughter's hair a break from styling, and after washing and applying a little product she was all set.  She picked out the headband for her hair, and I was able to leave it down/out for a week.  I love her hair all down/out, my only complaint is the detangling once we do wash it.  There are always alot of knots to get out, not very fun for either of us:(  But I don't think there is any way to avoid that:)  When N. has her hair down, whether it's cornrows, braids, or twists, she sleeps with her satin hair wrap.  I finally found the kind I like, the one that wraps and ties down the back, works the best for me. Any ideas/tips on detangling, let us know. *For some reason as I was editing this photo on photobucket, it discolored some of her face/mouth, weird editing:)


Princess Tiana Bun

Here is the Princess Tiana bun hairstyle.  The first one on my neice D. was done yesterday, she was so excited to have a Tiana bun:) She was a little upset that she couldn't find a green or a blue color tiara/crown, but I let her know that the one she brought was very pretty and it would look beautiful:)  When she saw her hair she was so happy with how it turned out, she really felt like a real princess, (too cute:)  The second one on my daughter N., was not specifically done for a Tiana look, she had a dance performance in Dec. last year and they wanted her hair up in a bun.  I didn't want to just pull her hair up in a boring old ponytail with the bun, so I took some tips from Nikki @ Beads Braids & Beyond and did the sock bun for the first time, added the cornrows as well as the flower clip for the special ocassion.


Monday, March 1, 2010

Crisscross Twisted Ponytails

The crisscross, twisted style into two ponytails.  This was alot of fun and alot of work :) After parting the front into the design of choice, I started twisting the hair as I added the rainbow pattern beads.  Then I tied off the top with rubber bands, twisted the ends of the back, tied them into the opposite sides of the ponytails. Their are also two big cornrows on each side. I have been making my own hair accessories to match the colors of an outfit or theme of the hair.  I use the wire that is used for the hair wraps.  Cutting the right size of wire, wrapping a bead at the bottom to keep the other beads from sliding off, then adding the colors of choice, and finally securing the end by wrapping the ends of the wire together.  Hopefully I explained that okay, if you'd like me to show you step by step with photos on this inexpensive way to accessorize your style just let me know:)


and...


Individual Braids

Okay, now these are some of my individual braids. What I love about this style is they are so versitile.  All down, half up, half down, pony tails, one pony, etc. It takes me about 2 to 3 hours (with a few breaks of course). The individual braids that I do stay in for about 2 weeks, maybe a little longer.  I don't like any style to stay in for longer than that (just my opinion).  Hope you like:)

and...


Cornrow Ponytails

Here are some styles of different ways to create the cornrows into ponytails.  I made these styles awhile ago, but as I remember they took about 3 hours.  Doing them again today, I would say about 1 1/2 to 2 hours to create these looks.  Let me know you are interested in step by step instructions on creating a certain look.


and...


Deep Conditioning Treatment Review

I was recently searching for a new deep conditioning treatment for the kids. Mainly I wanted something that was semi or all natural. I ran across many products in Sally's (beauty supply store), although most were ridiculously priced or they had way too many ingredients.  I have bought Motions products before and loved them.  So, I picked their CPR Deep Conditioning and Repair Treatment.  I washed their hair regularly, applied the treatment, and put the shower cap on, (my son 2 yrs. old was not feeling the shower cap, and quickly ripped that off :) After it set for about 5-10 minutes, I rinsed out with cool water, and quickly noticed how smooth and soft their hair was.  I liked this product for the end result, however my only complaint is that it has alot of small herbal pieces that are hard to wash out when rinsing. Please feel free to share  brands/product info. with us that you have had good results with; especially those for curly hair types, and children.